Image editing for book bloggers with Affinity Photo
[Advertisement] My book blog and photography now go firmly hand in hand. Since I love showcasing beautiful editions, it’s become a fixed part of my posts to show the book as well. The images should whet your appetite—not only through text, but also visually—by showing what I love about these books. So a new post doesn’t just mean writing the actual review; it also always includes a small photo session and, of course, the editing and preparation of those images.
When you talk about image editing, everyone instantly thinks of Adobe Photoshop—which, price-wise, doesn’t make much sense for the average user. Plenty of free and low-budget solutions try to fill the gap, but you usually have to make a lot of compromises. Today I’d like to introduce you to Affinity Photo—a piece of software that’s a real insider tip and that I’m thoroughly excited about. Why the switch is worth it, you’ll find out here.
I’ve tried quite a few photo editors. For a while I used the free, open-source program GIMP, which is not exactly a usability triumph and always feels a bit clunky and annoying. It can do everything I regularly need, but it isn’t particularly comfortable to use, and nearly everything takes one extra click. Paint.NET always felt too stripped down—lots of functions were simply missing—and PhotoScape is much the same. I tested a few tools but always ended up going back to my outdated version of Photoshop. I also found Adobe Lightroom interesting, but it’s geared more toward organizing photos and, at least back then in the first version, I missed functionality for retouching. At some point I stopped looking. Habit wins out, after all, and everything I need for the digital darkroom was there. I didn’t think much more about my image editor until a colleague showed me Affinity Photo, which can keep up with Photoshop but costs an affordable one-time fee of €55.
Features
When I shoot photos for a post, I usually don’t really have time. The family’s buzzing around me, I have a thousand other things to do, and I don’t get around to blogging until late in the evening—when there’s no daylight. On top of that there’s often poor or uneven lighting. In short: my photos are typically taken quickly, on the fly, with little care. So what does an image editor need to offer to be suitable for a blogger? The requirements probably aren’t far off the usual use cases. For editing my pictures I primarily use the following functions:
- The featured images for my current theme always have the same dimensions. Cropping, scaling, rotating, and choosing the image section are core functions.
- My huge digital-camera photos get scaled down to a small size. They’re often not perfectly sharp, so I need a sharpening function—ideally one I can fine-tune so the photo still looks natural and clean afterward.
- Basics like brightness, contrast, and levels are crucial.
- My white balance is often off, so I always need the ability to adjust color balance.
- Sometimes there are small distracting elements in the picture; for that I need the clone stamp.
- Uneven lighting pops up again and again. I need layer masks to even out brightness in just part of the image. Same for sharpening: often I only want the wooden background sharper, not the book itself. Or the background color is too intense and I want to reduce its saturation. For all that you need layers with proper masking—and, as a bonus, I want to be able to paint on those masks with a brush.
- All the usual basics like selection tools, layers, fill tool, etc., shouldn’t be missing.
- A solid exporter that outputs a well-compressed JPG.
- And very important: the software should feel smooth to use. No endless clicking and window-juggling. Proper previews for filters, etc.—basically the usability you’d expect nowadays.
Affinity Photo
Affinity Photo ticks all those boxes and offers everything I want in an image editor. It’s available for Windows, Mac, and iPad. I’m running the Windows version. Since I’m fastest on my Windows gaming laptop, I no longer use a tablet—too fiddly for a power nerd—so I didn’t test the iPad version. From what I’ve seen, the Mac version is identical to the Windows version.
Affinity Photo currently costs €54.99, but there are frequent promos where it drops to around €10. If you’re patient, you can grab a bargain. For the feature set, that’s a fantastic price. You can buy it via https://affinity.serif.com/de/photo/ and download it directly there. Affinity also offers a vector drawing program (Affinity Designer), essentially the counterpart to Adobe Illustrator. With those two tools, a software developer who also builds user interfaces (e.g., app development) is well equipped.
If you want to try it out first, there’s a 30-day trial on the Affinity Photo site. That’s how I initially kicked the tires to see if it was for me.
Example
To sketch the capabilities a bit, let me show you an example. This isn’t meant to be a tutorial—that would go beyond the scope here. (There are tutorials on the Affinity site, and there’s now also literature on the program.) If you’re coming from Photoshop like me, the switch is very easy. Many shortcuts are identical. I didn’t need long to get my bearings, and you find things where you’d expect them. It’s obvious the software’s primary goal is to be an affordable replacement for Adobe Photoshop—while improving usability a notch. And Affinity absolutely succeeds at that.
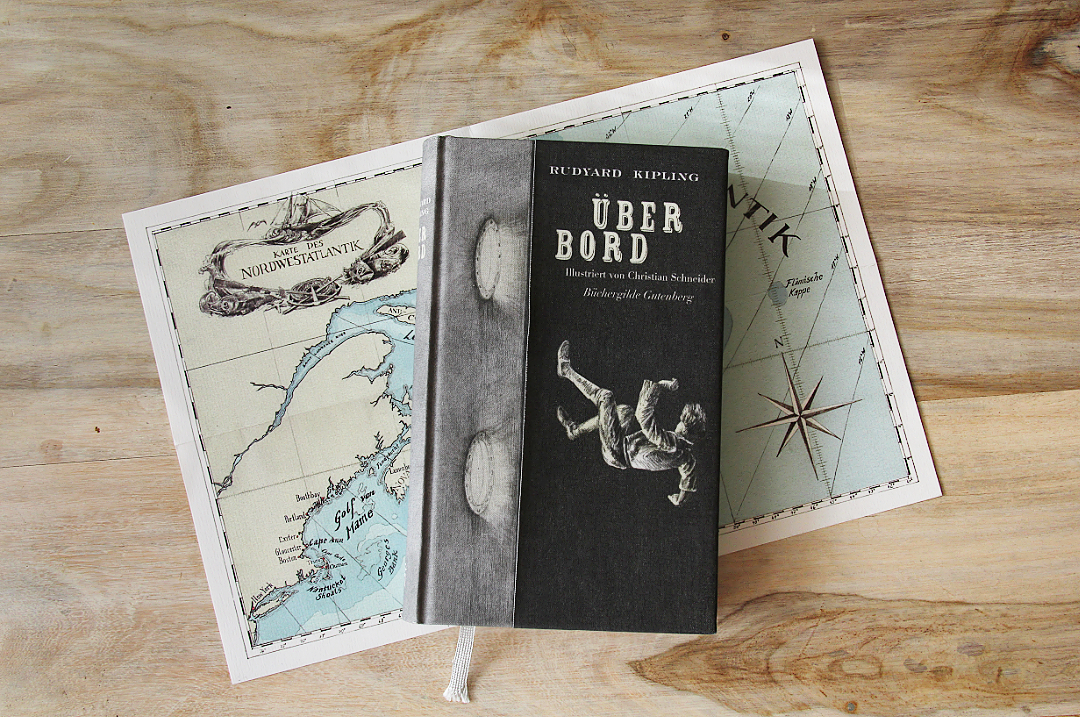
The source image is a photo of Über Bord, which I reviewed early last year. In its unedited form it looks like this:

The picture is a bit dark and flat. I shot it on our bench in the dining room, with a window on the left, so the photo gets darker toward the right. You can see the edge of the bench and my foot. Everything looks a bit soft, too. In other words, a typical quick-and-dirty shot from me.
Opened and edited in Affinity Photo, it now looks like this:
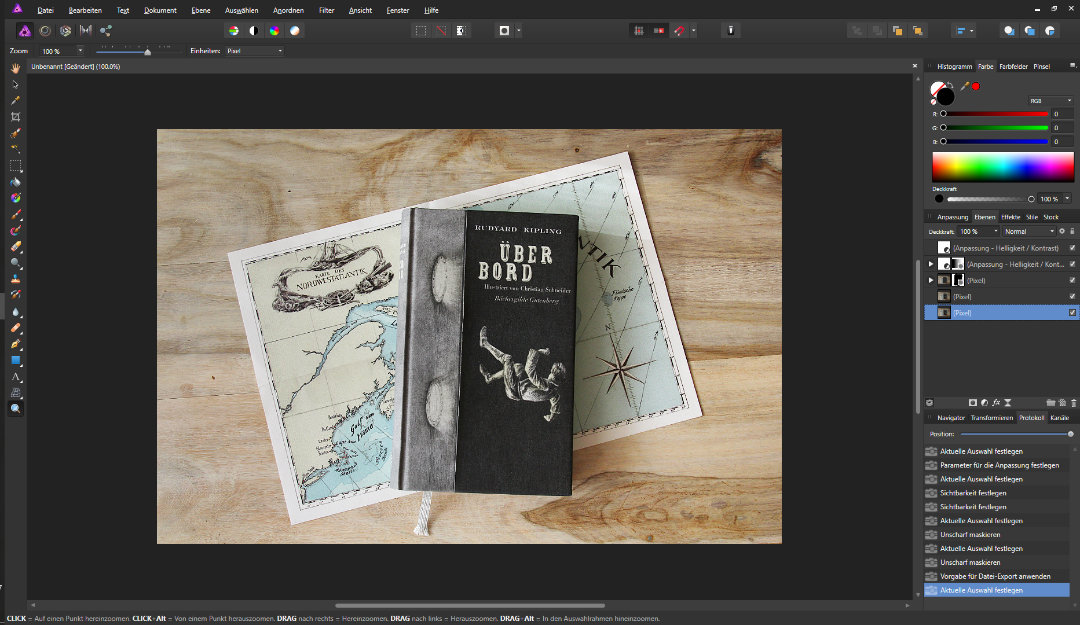
If you click the screenshot, you’ll see it full-size. Affinity Photo’s layout is like other editors: the tool palette is on the left with the familiar functions you know from Photoshop—scaling, masks, a retouch brush, clone stamp, zoom, and so on.
On the right, you have the histogram and color picker at the top. The latter is important—again with a primary and secondary color you can swap with the X shortcut (handy for painting on layer masks). Below that is the layers panel. In the Adjustments tab you can quickly pick effects that don’t alter the base image but are added as new layers over the photo. You can tweak them later or add a layer mask. All of that takes just a few clicks, and the window management felt more comfortable to me than in Photoshop. At the bottom you’ll find the history, which lets you easily undo individual steps.

What I did to the example photo is easy to see from the layers. First I cropped it so the bench edge is no longer visible. Then I increased brightness and contrast so everything looks punchier and not so washed out.
With the second layer (from the top) I also raised the brightness—but with a layer mask so the increase fades from right to left, balancing out the falloff in light. You can usually paint on the mask, and with the gradient tool you get this effect.
The third layer is a copy of the original image. With Filter → Sharpen → Unsharp Mask I strongly sharpened the wooden background. It can handle more sharpening than the book itself, which, with too much sharpening, gets ugly white halos or steps at the edges. So I created a layer mask here to exclude the book. On the image below it—where only the book shines through—I applied a gentler sharpening filter.
All of these adjustments take just a few clicks. Editing doesn’t take much time and is quickly done. I memorized a few shortcuts to save even more clicks, and I can retouch a photo in just a few minutes. The preview is brilliantly implemented, too. When you apply the sharpening filter, for example, there’s a movable split screen: one half shows the unedited image, the other the sharpened version—making it easy to judge the effect.
The final result looks like this:
Of course, the photos on my blog could be even better. For me it’s a time-benefit trade-off. I do have two studio lights in the basement, but by the time I’ve plugged them in and set them up, I’d rather grab the book and head outside. Our neighbor has a little garden shed and, a few years ago, replaced the wooden planks in front of it. By now, moisture has left them quite rotten and weathered. In the shade of the trees, though, it’s the perfect backdrop for close-ups of books. Only the screws sometimes stick out unpleasantly—but that’s what the clone stamp is for.
Conclusion
Affinity Photo is a fantastic image editor that leaves nothing to be desired for me. It can replace Adobe Photoshop on Windows and Mac without any trouble. It’s pleasant to use and offers everything a book blogger needs to polish photos—even advanced retouching with layer masks. Anyone who mainly wants to tweak basics like brightness, contrast, levels, and colors gets an easy-to-use tool here; and thanks to books and tutorials, you can pick up advanced techniques if needed. The switch from Adobe Photoshop was very easy for me. The price-performance ratio is excellent. With this feature set at this price, it’s an easy recommendation—and Affinity Photo has replaced Photoshop for me, both for everyday editing and for blogging and software development.
Hallo Tobi,
danke für diesen Tipp. Ich hatte bis vor ein paar Jahren ein tolles Bildprogramm, das dann aber nicht mehr weiter entwickelt wurde (ist über zehn Jahr her, ich weiß leider den Namen nicht mehr, es war auf alle Fälle gekauft). Seit dem „eiere“ ich herum. Eine Kollegin hat mir Gimp empfohlen, sie hat da ganz tolle Comics-Karten gestaltet etc. und ich dachte, wow. Aber irgendwie lief es bei mir auf Windows nicht. Ein paar Jahre später, der zweite Versuch mit gimp, lief zwar jetzt aber ich bin mit der Bedienung nicht zurecht gekommen. Funktionen die ich mit meinem alten Programm hatte, gab es da nicht. Zwischendurch mal über chip.de nach anderen Programmen gesucht und ausprobiert, mich hat nichts überzeugt. Dann mal immer wieder gehofft, dass die VHS einen Foto-Kurs anbietet, egal welchen, Hauptsache ich hätte können mal reinschnuppern. Wir wohnen auf dem Land, da war ich wohl zu fortschrittlich und erst vor kurzem habe ich einen entsprechenden Kurs (Photoshop) gesehen, die Termine passten nicht .. . Dann mich immer wieder am Standart-Paint gequält und schließlich ganz aufgegeben. Außer zuschneiden habe ich nichts mehr gemacht.
Deinen Beitrag finde ich gut, vielleicht probiere ich Affinity Photo mal aus …
Viele Grüße
Tanja
Liebe Tanja,
ich habe das Gefühl, dass es vielen wie mir geht und jeder irgendwie etwas ausgetestet hat, aber nie so richtig das Richtige gefunden hat. Für Affinity Photo gibt es mittlerweile auch ein paar Bücher und auch einen Videokurs. Mit den Büchern vom Rheinwerk Verlag habe ich bisher sehr gute Erfahrungen gemacht. Ich glaube, damit kommt man schon sehr weit. Dank der Testversion kannst Du ja schon vorher ein ganz gutes Bild von der Software machen. Also wenn du unsicher bist, dann schau dir das mal an, ich kann Affinity Photo nur empfehlen.
Liebe Grüße
Tobi
Mein Vater verwendet, neben Photoshop Elements, Affinity Photo auf seinem Mac. Ich selber verwende nur Pixelmator (gibt’s nur für Mac), liebäugle aber auch mit Affinity Photo, was wohl einiges mehr kann, als Pixelmator, aber preislich immer noch vollkommen im Rahmen ist.
Ich finde, es muss nicht immer Photoshop sein.
Liebe Verena,
auf dem Mac gibt es Affinity Photo schon etwas länger und dafür hat mir mein Kollege das einmal gezeigt. Als dann die Windows Version veröffentlicht wurde, hatte ich das dann doch recht bald auf dem Schirm. Für Photoshop bekommt man mittlerweile ziemlich viele Tutorials und Bücher, da hat man eine gute Auswahl. Aber Photoshop muss es definitiv nicht sein, wenn es so eine hervorragende Alternative gibt.
Herzliche Grüße
Tobi
Hi Tobi,
ein sehr schönes Beispiel einer Bearbeitungssoftware, werde ich mir mal vormerken.
Bei mir ist es zeitlich auch nicht gut bestellt, weshalb ich das von dir schon erwähnte lightroom nutze. Es hat zwar keine Ebenen- oder Maskenfunktion, lässt sich aber auf dem Tablet wunderbar einfach bedienen. Dafür mache ich die Bilder nicht zwischen Tür und Angel ;-) Da ich ab und zu auch mit Gimp arbeite, kann ich den Frust nachvollziehen, den dieses Programm erzeugt. Es hat zwar eine enorme Fülle an Funktionen, jedoch ist es mir zu frickelig.
Liebe Grüße
Marc
Das Programm kenne/kannte ich tatsächlich noch nicht. Danke für den Hinweis. Sieht sehr interessant aus, weil es auch RAWs verarbeiten kann. Sollte ich mein “gutmütiges, altes Arbeitstier” PS CS5 je über Bord werfen, dann kommt Affinity auf die Platte. lg_jochen
Lieber Jochen,
ich kann dir nur empfehlen Affinity Photo mal auszutesten. Gerade wenn du von Photoshop kommst, findest du dich da schnell zurecht. Und ich finde es schon eine Nummer komfortabler. Aber “gutmütiges, altes Arbeitstier” trifft es gut, irgendwann hat man eine Software gut abgesteckt und nutzt in alter Gewohnheit die bekannten Funktionen. So geht es mir mit einigen Tools.
Liebe Grüße
Tobi
Dafür, dass Du eigentlich keine Zeit dafür hast, sehen Deine Fotos immer sehr ästhetisch und gut vorbereitet aus. Ich glaube Du hast einfach ein gutes Händchen dafür Dinge schön in Szene zu setzen. Die Nachbearbeitung ist dann wohl nur noch das i-Tüpfelchen. Danke für den Tip -> Affinity -> Schaut wirklich interessant aus, vor allem weil es auch für den Mac verfügbar ist ;) …
Hi Tobi,
ein sehr schöner Beitrag, dem ich voll und ganz zustimmen kann. Ich habe Affinity Photo vor zwei Jahren entdeckt, damals mit der Testversion für Mac und bin sehr begeistert von dem Programm. Der Einstieg ist, gerade für Photoshop-Nutzer, sehr einfach – anders als bei Gimp. Da es Affinity Photo ja mittlerweile auch für Windows und für kleines Geld gibt, liebäugel ich schon eine ganze Zeit mit dem Programm.
Liebe Grüße
Julia
Auf genau solch einen Beitrag wartete ich! Ich bin leidenschaftliche Hobby-Fotografin und finde es auch wahnsinnig wichtig, meine Bücher bestmöglich zu präsentieren. Denn das ist es, was auch auf einem Buchblog zuerst ins Auge fällt. Unter- oder überbelichtete Fotos, genauso wie unscharfe oder verwackelte Fotos oder solche mit wenig ansprechendem Hintergrund wirken einfach nicht attraktiv auf den Besucher.
Neri, Leselaunen
Hallo Tobi,
danke für den Tipp. Ich überlege schon länger, mir wieder Photoshop zuzulegen, aber der preis schreckt doch sehr ab. Mit Gimp komme ich einfach nicht zurecht, so oft ich es auch versuche. ich vergesse ständig die simpelsten Dinge, weil das Programm einfach nicht logisch aufgebaut ist. Im Moment benutze ich sehr oft mein Handy um Fotos zu machen und zu bearbeiten, aber das ist auch keine Dauerlösung.
LG, die Lady
Hi,
hast du die Lizenz direkt auf der Webseite bestellt? Dr preis dort wird nur in Pfund angezeigt, war das bei dir auch so?
//Huebi
Hallo Huebi,
ich habe die Lizenz auf der Webseite bestellt und bekomme den Preis auch in Euro angezeigt. Bist du irgendwie über ein VPN oder so online? Oder mit einem Browser, der eine andere Lokalization mitschickt? Die Seite von denen hat eigentlich ganz gut funktioniert.
Aber sehr cool, dass ich Dich von der Software überzeugen kann. Muss aber sagen, dass ich immernoch sehr begeistert davon bin.
Herzliche Grüße
Tobi
Hallo in die Runde,
Ich erstelle selber Photobooks für meinen Kunstbuchverlag, der mich unterstützt. Ich mache vor allem Buchstrecken über Urban Art also die Schönheit der Städte. Für diese Bücher nehme ich tatsächlich Affinity, darum musste ich hier schreiben… Das ist wirklich super und auch für mich als Computer Abstinenzlerin verständlich…Qualitativ wirklich für meine Fotografie Kunst zu gebrauchen!
LG, Anja